WHAT’S THE PURPOSE FOR DOING THIS?
When you are in the process of developing a new website, often its a GREAT idea to check out HOW the development site will look BEFORE you actually launch it and make it live at your registered domain (i.e. www.your-domain.com). The absolute best way to do this is by making one small change on YOUR computer so that ONLY your computer will see the development site as the “live” site when you type in your domain name in your web browser. In other words… everyone else in the world will continue to see your actual live site as the “live site”, but ONLY YOU will see the development site as the “live site”.
EDITING THE LOCAL “HOSTS” FILE TO ACCOMPLISH THIS
There is one single file on your computer that controls redirecting your web browser the the website of your choosing when you type a domain name into your web browser. This one file is called the hosts file as that is the actual name of the file itself (with no extension on the end). Follow these steps to edit the hosts file on your computer:
These Steps are for Windows 7. For Windows 8 computers, see a special note below:
- First of all MAKE SURE you are logged into your Windows computer with an administrative account.
- Next, click on the Start button and then click Computer
- Navigate to this folder on your computer: C:\Windows\System32\drivers\etc. In this folder you will see a file named hosts (just like the image above).
- Right-click on the file and select RENAME.
- Add a .txt file extension onto the end of the file so that it is now named hosts.txt
- Double-click on the hosts.txt file and it will open up in Notepad.
- You will now add two new lines to the VERY BOTTOM of this file. The content of these 2 new lines will be Dev Server IP Address <space> Domain Name. Either your hosting company OR your new website developer will be able to provide you with the Dev Server IP Address.
For example, if your hosting company has given you a Dev Server IP Address of: 122.104.54.119 then your new line entry at the bottom of the hosts file will be:
122.104.54.119 domain.com
122.104.54.119 www.domain.com
Notice how you have 2 lines, one that references your domain name WITHOUT a www in front and one WITH a www in front. This is to ensure proper resolution to the development server no matter which one is the official registered domain name. - Exit out of Notepad and be sure to SAVE the file. –IMPORTANT NOTE– Some of the anti virus software including Microsoft Security Essential (Windows Defender) do not allow modifying host file for security purpose. This is to prevent host file modification by any virus, spywares or malware. If you face this issue, you need to disable the anti virus software temporarily or set exception for the file.
- Lastly (and this is a VERY IMPORTANT step), right-click the hosts.txt file and select RENAME again. This time you will REMOVE the .txt extension so that the file is once again simply named hosts (with no extension on the end).
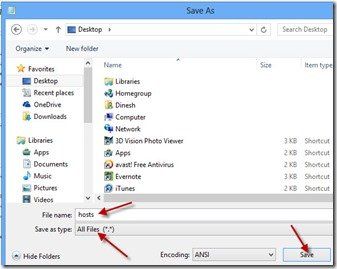
For Windows 8 Users: When you try to save the renamed hosts file it will unfortunately not allow you to as overwriting this file is not permitted. Instead, save the file to different location (like My Documents or the Desktop), make sure you are saving it as ‘hosts’ and selecting the file type as ‘All Files’ as shown below.
Now you simply have to copy or cut the file and paste it back into its correct location of C:\Windows\System32\Drivers\etc.
Since the same file named hosts already exists at this location, you need to accept replacing existing host file with new one.

Once you have replaced the file, the new edited hosts file will be active on your Windows 8 computer.
TEST THAT YOU ARE NOW LOOKING AT THE DEVELOPMENT SERVER WHEN ENTERING DOMAIN.COM IN YOUR BROWSER
The next step is to test and make sure that you are now properly pointed the DEVELOPMENT server instead of the current live server. To do this, follow these steps:
- click the START button and in the search field, type cmd (short for command) and press the ENTER key. This will open a Command (or DOS) Prompt.
- Now type in the command prompt: ping domain.com (but enter your ACTUAL domain name instead of domain.com).
So in the example above, you would enter ping abcpetstore.com. This SHOULD display the following results:

If you see 4 lines starting with “Reply from…” and the IP Address of the Development Server, then you have made the edits correctly and are now pointing to the development website when you enter domain.com or www.domain.com into your Web Browser.